PageMaker 7.0 Basics: Workspace, Toolbox & Rulers
Getting to Know the the PageMaker Workppace
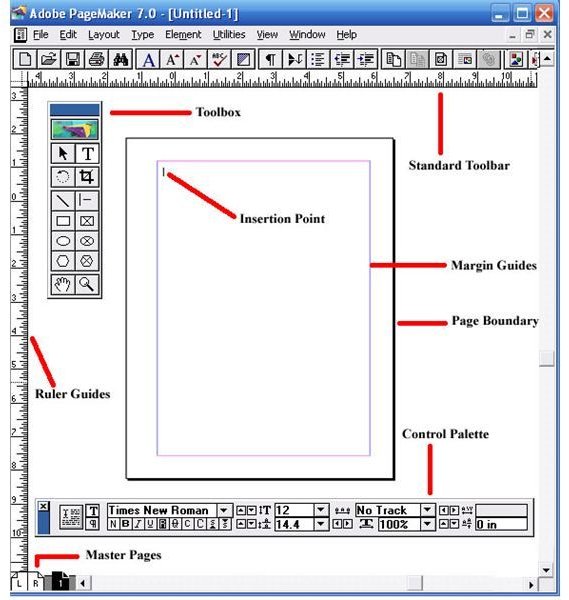
You'll find all the powerful toos and features of this versatile program in the PageMaker workspace. It features a menu bar across the top of yourscreen, the PageMaker window that contains your document, and a range of tools and palettes that you can use to create and edit a document. Start with the workspace, then learn about the Toolbox feature, rulers and guides.
The PageMaker window is designed to provide a number of elements to facilitate creating and editing a document. Learning the purpose of these elements will make working in PageMaker much easier. Here are the elements that you are most likely to use:-
Title Bar
The title bar will display the name of your document. If you are working with a brand new document and have yet to name it, the title bar will simply read: Untitled-1.
Rulers
PageMaker provides two customizable rulers, which run horizontally and vertically along your screen. You can set the rulers to measure in either inches or picas (picas are a unit of measurement unique to typography. One pica is equivalent to 12 points, which is about 1/6 of an inch).
Pasteboard
This is the background that lies behind your PageMaker document. It is a handy element to use if you need to move text or images between pages. You can also place these items on the pasteboard until you decide where to position them on the page. Any text or images that you place on the pasteboard won't print.
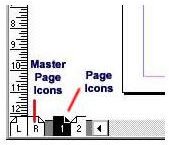
Page Icons
The numbered page icons at the bottom left-hand corner of your screen each represent the pages of the document you are working on. The icon of the particular page that you are viewing will be highlighted.
The L and R icons in the extreme left represent your master pages. Any items on the master pages appear on all of the document's pages- Page Boundaries
These represent the edges of your paper. Any text or images that lie outside the boundaries or overlap them will not be printed.
Scroll Bars
Much like Word and other Microsoft programs, these are designed to enable you to move from one point to the other on the page you are working on. However, you won't use the scroll bars to move from one page to another.
Resize Box
This is located in the lower right-hand corner of the screen, and is used to adjust the size of the window. To resize the window, you will click and drag here to adjust the window to the size you desire.
Previous Size Box
Also called the "Refresh Box," this feature is in the upper right corner and is used to refresh your screen display. It is particularly useful if you are experimenting with different styles and sizes. Using this feature clears the screen of previous edits so you can start afresh. The ToolBox
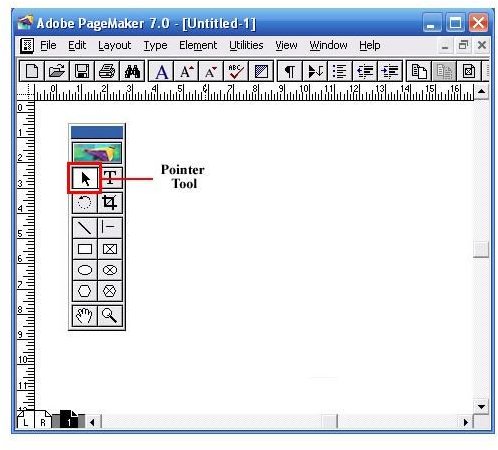
The Adobe PageMaker toolbox offers all the desktop publishing tools you need to design brochures, postcards, business cards, letterheads, or otherpublications in PageMaker. To display and access the Toolbox, click on the "Window" menu and click on "Tools." The toolbox will now be displayed. You can toggle between a visible and hidden toolbox as needed to maximize your workspace.- The Pointer ToolThe Pointer tool enables you to pick, drag and drop text boxes, images and other objects, which can then be resized, moved or can have their attributes changed.
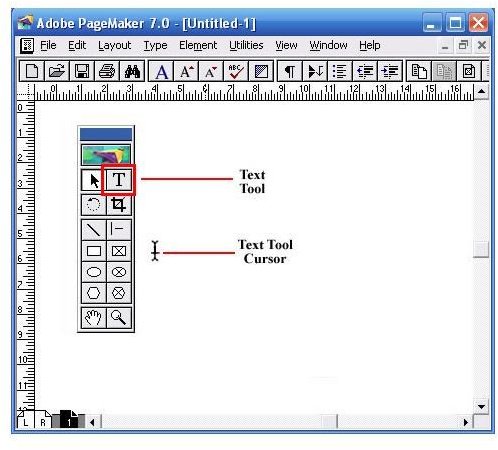
The Text Tool
The Text tool enables you to select and edit text, as well as insert text boxes. Click the text tool and then click on the document and start typing in text.Rotate Tool
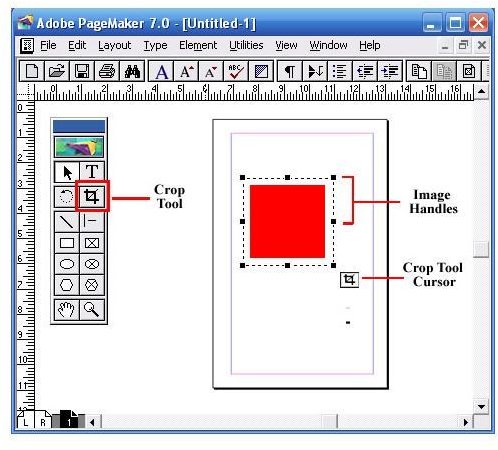
The rotate tool enables you to rotate a text box or image to a desired angle. Select the rotate tool, and click on the object's reference point. Drag the object to the angle you want it to be.- Crop ToolEnables you to crop imported images down to size. You can only use this Pagemaker tool on .tiff images.
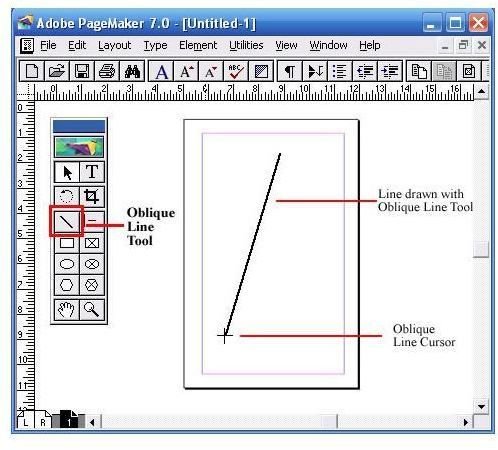
- Oblique Line ToolEnables you to draw straight lines at an angle. Click on the oblique line tool, then click on the document. Drag in the desired direction to draw a line.
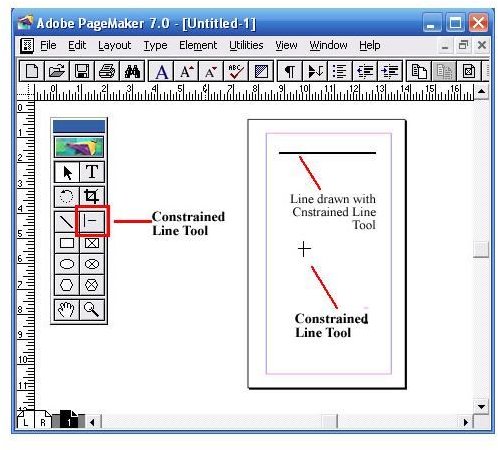
Constrained Line
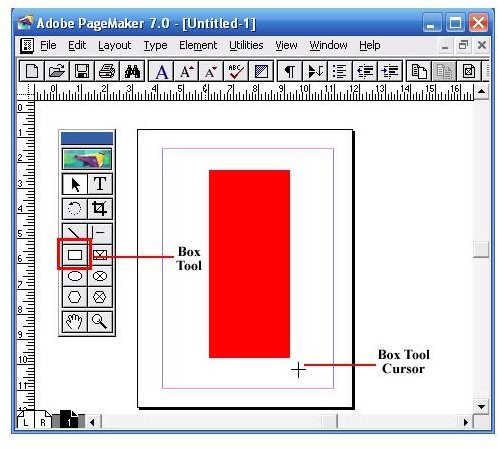
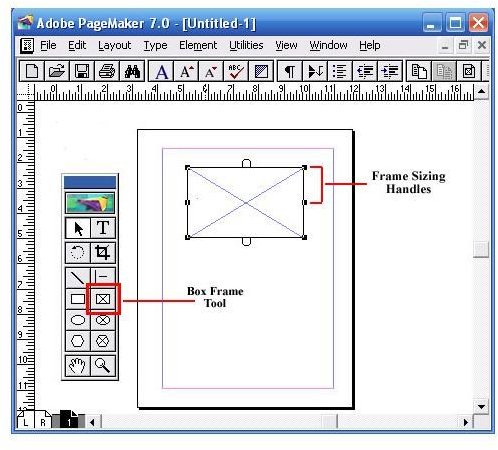
The constrained line tool enables you to draw horizontal, vertical and 45-degree angle lines. Click on the constrained line tool, then click on the document. Drag in the desired direction to draw a line.Box Tool
The box tool enables you to create rectangular shapes. Select the box tool and click on the document. Drag to create a rectangular shape.Rectangle Frame Tool
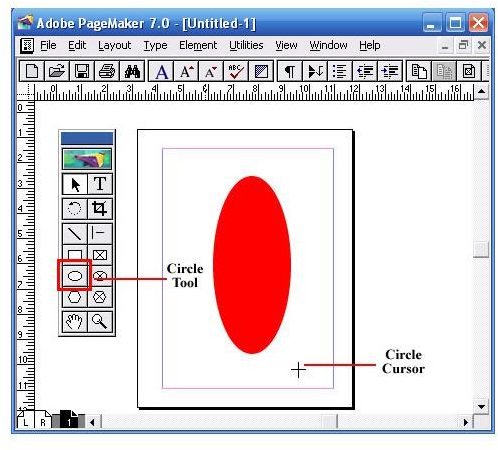
The rectangle frame tool enables you to create a rectangular text box that you can type your text into. Select the rectangle frame tool, then click on the document. Drag to draw a rectangular frame. Select the Text tool from the toolbox and click inside the frame. Type in your text. The text will be confined within the text box.- Circle ToolThe circle tool enables you to create a circular or oval shape. Select the circle tool, click on the document. Drag to draw a circle or ellipse.
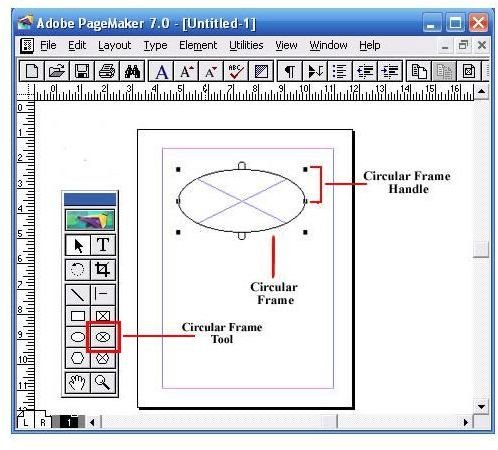
The circular frame tool enables you to create a circular or oval-shaped text box that you can type your text into. Select the circular frame tool, then click on the document. Drag to draw the circular frame. Select the text tool from the toolbox and click inside the frame. Type in your text. The text will be confined within the text box.
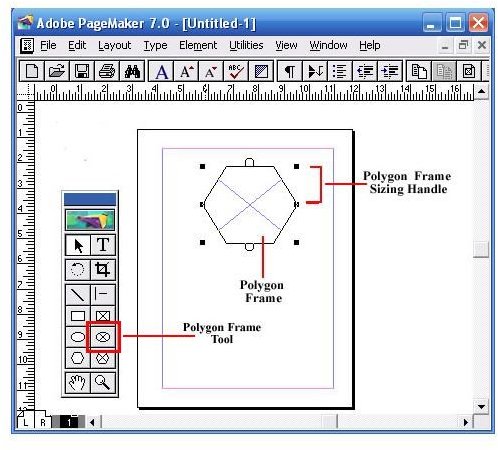
- The polygon tool enables you to create a shape that has more than four sides. Select the circular frame tool, then click on the document. Drag to draw the polygonal shape. To modify the polygonal shape, click on Element and then select Polygon Settings from the drop down menu.
- The polygon frame tool enables you to create a polygonal text box. Select the polygon frame tool, then click on the document. Drag to draw the
polygon frame. Select the text tool from the toolbox and click inside the frame. Type in your text. The text will be confined within the text box.
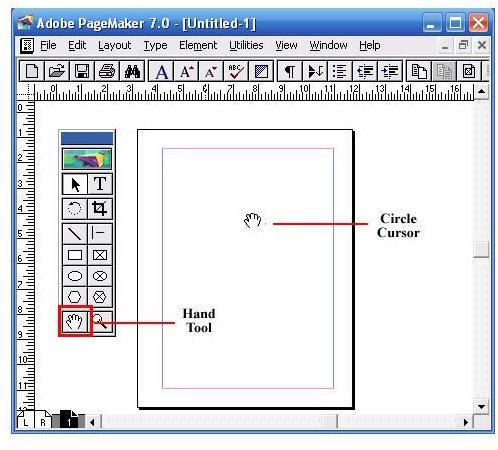
- The Hand ToolThe hand tool enables you to reposition a page on your screen for optimal view. It is especially useful when you are working with a large document and need to navigate a large page. Select the hand tool and click on the page. Drag to navigate from one part of the page to another.
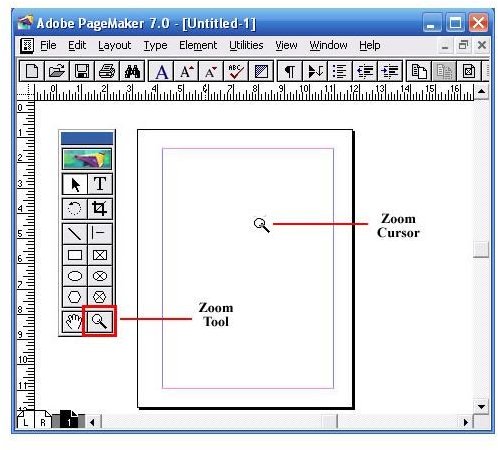
The zoom tool enables you to magnify or shrink the area of the page on your screen.
- Rulers and guides are crucial desktop publishing tools for document layout. The horizontal and vertical rulers are designed to help you position the different elements on your page. They need to be visible if you want to use the ruler guides.
- To display the rulers, click on the View menu and then select Show Rulers.
- To hide the rulers, select Hide Rulers in the View menu.
- To toggle between displaying and hiding the rulers use the short cut: [Ctrl + R]
How to Change the Ruler Unit of Measurements
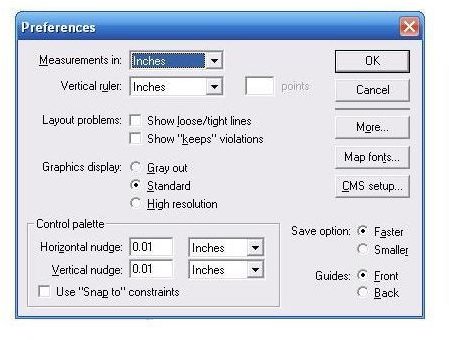
You can specify and change the system of measurement to use for your rulers. In the Windows version of PageMaker, you can even choose a differentmeasurement unit for each ruler. Here's how to change ruler unit of measurements:
- Click on the File menu, and then select Preferences.
- Click on General… to open the Preferences dialog box. (Short Cut: Ctrl+K).
- Click on the Measurements in drop-down list, and choose a measurement system for your horizontal ruler.
- Click on the Vertical ruler drop-down list, and choose a measurement system for your vertical ruler.
- Click on OK.
Ruler Guides
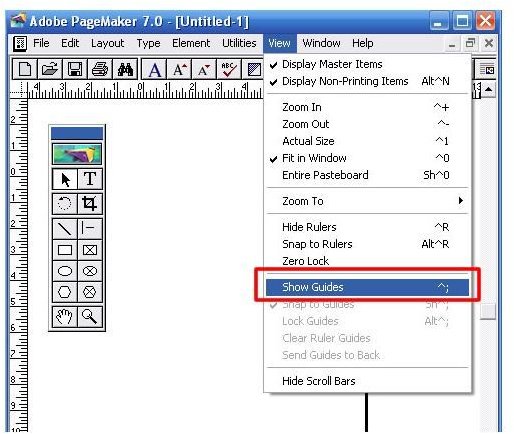
The PageMaker ruler guides are non-printing lines that help you position text and images on the pages of your document precisely. You can display,hide lock, move and remove the ruler guides as your needs change.
You need to display the ruler guides in order to use them to position elements in the document, but you can also hide them if you want to view just the elements that will print.- To display the ruler guides, click on the View menu and then select Show Guides.
- To hide the ruler guides when they are activated, select Hide Guides under in the View menu.
- To toggle between showing and hiding the ruler guides, use the short cut: [Ctrl + ;]
- LockingYou can lock the Ruler Guides in place to avoid moving them unintentionally.
- To lock the ruler guides, click on the View menu and then select Lock Guides.
- To unlock the Ruler Guides, deselect Lock Guides under in the View menu.
- To toggle between locking and unlocking the Guides use the shortcut: [Alt+Ctrl+ ]
PositioningYou can position new ruler guides as needed so as to align elements in your document. You can create as many ruler guides as you need.- Display the horizontal or vertical ruler from which you want to position the guide [View >> Show Rulers]
- Click on the Pointer tool and then position it anywhere in the ruler area. Now click and hold.
- Drag and drop the guide to the position you desire on your document. The new guide will appear as a colored line.
- You can reposition a ruler guide at any time with a similar drag and drop method. If the guide is locked, you need to unlock it [View >> Lock Guides] before you can move it.
RemovingYou can remove your ruler guides individually or all at one time.- To remove an individual guide, select the pointer tool, then click and hold your guide. Drag it back into the ruler area, and then release.
- To remove the ruler guides all at one time, click on the View menu and then select Clear Ruler Guides. This will remove all the ruler guides you placed in the document, leaving the column and margin guides behind.
-
NOTE: If the guide is locked, you need to unlock it [View >> Lock Guides] before you can remove it.
Using 'Snap-To'You can position elements in your document by forcing alignment. This is a quick way to position multiple elements consistently. You can do this by making the element or elements align with (snap to) your ruler increments or to ruler guides.- To snap to rulers, click on the View menu and then select Snap to Rulers. This snaps the object to the nearest ruler increment.
- To snap to a guide, click on the View menu and then select Snap to Guides. This snaps the object to a ruler guide if it is moved within 3 pixels of the guide.
- To deactivate the Snap to feature, click the View menu and deselect the option.


Tidak ada komentar:
Posting Komentar